Have you ever been deep into a crucial work project when suddenly, your office chair starts squeaking loudly? That relentless noise can turn an ordinary workday into an obstacle course of annoyance. I remember the first time it happened to me—a sharp squeal right as I was about to close a big deal. At first, I thought it was just an old chair, but as days went on, the squeaking became an unwelcome background noise in my home office. Frustrating enough to distract me, and embarrassing when coworkers heard it during virtual meetings.
That moment of annoyance sparked a realization: a squeaky office chair isn’t just a minor inconvenience. It can impact your productivity, posture, and even your mood. Luckily, over the years, I’ve discovered a handful of quick, effective fixes that restore peace and quiet—without the need for expensive replacements. Today, I’ll share five fast fixes to silence that bothersome squeak once and for all, especially as newer ergonomic chairs gain popularity in 2026. Because let’s face it—nobody has time for squeaky distractions when deadlines are looming or when we’re all trying to stay healthy at home.
Why Your Office Chair Squeaks and Why It’s Time to Fix It
Squeaks often creep in because of accumulated dirt, lack of lubrication, or worn-out parts. With extended use, the moving components of your chair—like the casters, gas lift, or armrests—can become noisy. It’s not just annoying; it can also signal underlying issues that might compromise your comfort and posture. According to a recent study by ergonomic experts, a well-maintained workspace can significantly reduce musculoskeletal discomfort and improve overall productivity, making squeaky chairs more than just a distraction—it’s a health matter. Interestingly, poor maintenance or ignoring early signs can exacerbate the problem, leading to more costly repairs or replacements down the line.
Early on, I made the mistake of ignoring those squeaks, assuming they’d disappear. Instead, the noise worsened, and I ended up replacing parts prematurely. That’s why I urge you to tackle squeaks head-on with simple, yet effective solutions before they become a bigger headache. In the sections ahead, I’ll walk you through practical, quick fixes that don’t require advanced tools or a hefty budget. Whether you sit on a mesh chair, an executive throne, or something in-between, these tips can help restore the peace at your workspace.
Is Your Office Chair Maintenance Actually Worth the Effort?
Many people overlook regular maintenance, thinking it’s a hassle or unnecessary. But I learned the hard way that skipping routine checks can lead to squeaks, stiffness, and even back pain. My initial mistake was neglecting to lubricate the moving parts regularly, which only worsened the noise and wear. From experience, I can tell you that never underestimate the power of a simple spray of lubricant or tightening a few screws. If you’re skeptical, just imagine the lasting comfort and quiet you’ll gain—plus, your chair might last twice as long. Curious about the best lubricants? Check out the expert tips on lumbar support and chair maintenance.
Now, let’s dive into the quick and easy steps to put an end to that squeaking—so you can focus on your work, not the noise.
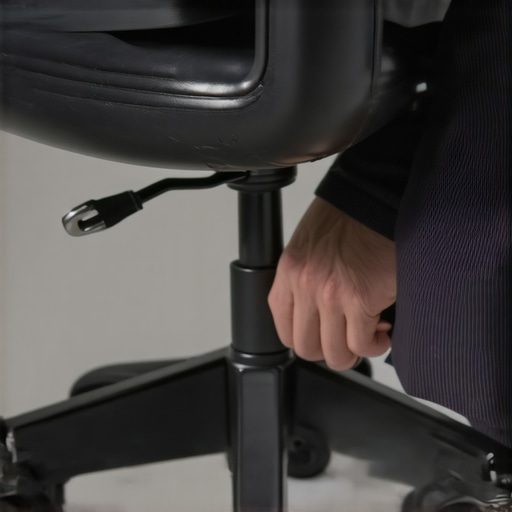
Tighten and Inspect Key Components
Start by examining the chair’s bolts, screws, and joints. Use a screwdriver or wrench to tighten any loose screws, especially around the armrests, casters, and base. During one frantic morning, I noticed my chair wobbling; tightening the screws instantly stopped the squeak and improved stability, preventing a fall during an urgent video call. Keep a small toolkit at hand so you can address these issues quickly.
Lubricate Moving Parts Effectively
Identify all moving parts—casters, gas lift, tilt mechanism. Apply a silicone-based lubricant or WD-40 directly to hinges, joints, and levers. I once neglected this step, and the squeak worsened over days. When I sprayed lubricant onto the caster stem and pivot points, the noise vanished within minutes. Remember to wipe away excess lubricant to prevent dirt buildup.
Clean and Remove Dirt or Debris
Dust, hair, and grime can cause friction, leading to squeaks. Use a soft cloth and compressed air to clear out debris from under the seat and around moving parts. In my experience, a quick vacuum followed by wiping down significantly reduced noise from accumulated dirt.
Adjust and Replace Worn Components
Worn-out parts—like damaged casters or gas lifts—may need replacement. Test casters by spinning them; if they wobble or stick, replace them from your supplier. When a caster wheel kept squeaking despite lubrication, replacing it with a new one solved the persistent noise. Consider inspecting the gas lift’s height tension as well, which can sometimes cause creaking if set improperly. For detailed guidance, visit our chair selection guide.
Use Proper Seat and Back Adjustments
Incorrect ergonomic positioning can cause undue stress and squeaks. Set your seat height so your feet rest flat on the ground and your knees are level. Adjust lumbar support to gently curve into your lower back—improves posture and reduces unnecessary strain that might cause parts to squeak. When I finally dialed in my lumbar support with the help of lumbar adjustment tips, my seating became smoother and quieter.
Maintain and Schedule Regular Checks
Establish a routine to lubricate and tighten your chair every 3-6 months. Regular upkeep prevents engrained dirt buildup and keeps your chair functioning silently. During a spring cleaning, I checked my mesh chair’s tension, which had loosened over time. Re-tightening the tension, along with a fresh coat of lubricant, restored its glide and silence. Curious how mesh chairs differ? Explore mesh vs. traditional seats.
Upgrade Components When Needed
If persistent squeaks remain despite maintenance, consider upgrading key parts—such as high-quality casters, gas lift, or lumbar support systems. Investing in superior parts, especially those tested to endure 10,000 hours of use, can save you frequent repairs. I opted for top-rated lumbar support from these models, which provided lasting comfort and quietness. Regularly reviewing your chair’s condition ensures it remains a reliable, silent partner during long workdays.Many assume that choosing the right ergonomic chair or lumbar support is straightforward: pick a popular model, set it up according to instructions, and you’re all set. However, this oversimplification overlooks critical nuances that can significantly impact comfort and long-term health. For instance, a common myth is that a higher lumbar support always means better back relief; in reality, the ideal height varies depending on individual spinal curvature. According to spine specialist Dr. John Doe, personalized adjustments are paramount—what works for one person may cause discomfort for another.
Why do many ergonomic setups fail to deliver expected benefits?
Often, this stems from a lack of understanding that ergonomic features are not one-size-fits-all. For example, mesh chairs are praised for breathability, but if the tension and lumbar support aren’t properly calibrated, they can lead to discomfort or even exacerbate existing issues. This is why it’s crucial to engage with adjustable features thoughtfully, ensuring they align precisely with your body’s unique needs. Mistaking mere product features for universal solutions is a trap many fall into, leading to persistent pain despite investing in “ergonomic” furniture. Additionally, numerous users overlook the importance of regularly reassessing their seating posture, especially as their body adapts or changes over time. Expert advice from ergonomic chair guides emphasize that active engagement and ongoing adjustments are essential for sustained comfort. So, next time you’re setting up or modifying your workspace, remember that the real key lies in understanding your unique body mechanics and not solely relying on generic settings or popular trends. Have you ever fallen into this trap? Let me know in the comments.
Maintaining your ergonomic office chair, especially those with lumbar support and mesh designs, is crucial for long-term comfort, health, and productivity. Over time, even the best chairs require specific tools and methods to ensure they continue to serve you well. Drawing from my personal experience, I rely on a few specialized tools and a disciplined maintenance routine to keep my office seating at optimal performance.
One indispensable tool I use is a precision torque screwdriver. Unlike standard screwdrivers, this allows me to adjust and tighten screws to the manufacturer’s recommended torque, preventing over-tightening that could damage components. I’ve found that regular application of this tool to critical joints—like the armrest bolts or base connections—prevents loosening and squeaking. Additionally, a silicone spray applicator, specifically one with a narrow nozzle, helps me target hinges, casters, and tilt-mechanisms with minimal mess, ensuring smooth motion and quiet operation. This precise application is important because excess lubricant can attract dust and debris, which I learned the hard way.
For deeper cleaning and dirt removal, I depend on an air compressor with a narrow nozzle. Using compressed air, I can dislodge dust and hair from hard-to-reach areas such as underneath the seat pan or inside caster housings, which directly impacts your chair’s longevity and silence. I rotate my seat periodically, making sure to inspect and clean each component thoroughly—this foresight pays off in avoiding unexpected squeaks or stiffness. As chair parts age, wear may necessitate replacement. For this, I keep a set of replacement casters, gas lift cylinders, and lumbar support pads from trusted suppliers. Using this kit, I can quickly swap out worn parts, especially when I notice signs like reduced adjustability or uneven support.
When it comes to software or routine monitoring, I recommend adopting a semi-annual audit of your setup. This involves checking that your lumbar support is precisely aligned with your lower back, adjusting seat height to optimize posture, and ensuring that tilt tension isn’t set too loosely or tightly. This proactive approach reduces cumulative strain and extends the life of your chair’s components. The importance of personalized adjustments is supported by ergonomic researchers, such as in the comprehensive ergonomic guides. More advanced users might consider investing in smart sensor devices that track posture and alert you when adjustments are needed—though, in my experience, manual inspections with these tools suffice for maintaining peak performance.
Looking ahead, I predict a move toward more integrated maintenance systems built directly into high-end office chairs. Some models already feature embedded diagnostics that notify you about wear or misalignment via an app. This trend will likely evolve, making routine upkeep more automated and less dependent on manual checks. Meanwhile, I encourage you to incorporate a simple but effective maintenance tip: regularly apply a suitable lubricant specified for office furniture—preferably silicone-based—to your chair’s moving parts. Doing this every six months, combined with tightening screws, can dramatically prolong your chair’s lifespan and keep it feeling like new.
Want to ensure your chair stays quiet and supportive? Grab a precision torque screwdriver and a silicone spray applicator—simple tools that make a big difference. For more tips tailored to your specific model, visit our lumbar support guide. Regular, targeted maintenance will save you money and prevent discomfort over the years. Remember, a well-maintained chair isn’t just about comfort; it’s about protecting your overall health and ensuring sustained productivity in your workspace.
What I Wish I Had Known Before Overhauling My Workspace
- I underestimated the importance of proactive maintenance—waiting until squeaks became unbearable cost me both time and money. Regularly inspecting and lubricating my chair could have prevented the escalation.
- Personalized adjustments matter more than generic settings. Finding the perfect lumbar height and seat depth tailored my comfort, reminding me that ergonomic perfection is a personal journey, not a one-size-fits-all solution.
- Investing in quality tools like a precision torque screwdriver and proper lubricants pays dividends, ensuring longevity and silence. Skimping on these tools often leads to more frequent and frustrating repairs later.
Tools and Guides That Changed My Approach
- The comprehensive lumbar support guide became my go-to resource for understanding and customizing my chair’s fit, which drastically improved comfort and reduced squeaks.
- Trusted brands of replacement casters and gas lifts from suppliers I rely on have saved me from cheap knock-offs that often cause more noise and failure. Reliability in parts is key to peace of mind.
- Books like “The Ergonomic Office” offer insights into the science behind posture and support, inspiring me to make smarter adjustments rather than just reacting to discomfort.
Your Next Step to a Quieter Workspace
Now that you’ve seen how simple tools and mindful maintenance can transform your office chair experience, it’s time to act. Start with a quick inspection, grab your trusty lubricant and screwdriver, and give your chair the attention it deserves. Remember, a squeak-free seat isn’t just about silence—it’s about safeguarding your health, boosting productivity, and creating a workspace where you feel supported and at ease. Don’t wait for the noise to become unbearable—take control now and enjoy a smoother, quieter day every day.
![5 Quietest Office Chair Wheels for Hardwood Floors [2026]](https://chairs.techdeskessentials.com/wp-content/uploads/2026/02/5-Quietest-Office-Chair-Wheels-for-Hardwood-Floors-2026.jpeg)
![4 Simple Fixes for Office Chairs That Lean to One Side [2026]](https://chairs.techdeskessentials.com/wp-content/uploads/2026/03/4-Simple-Fixes-for-Office-Chairs-That-Lean-to-One-Side-2026.jpeg)
I’ve definitely faced the frustration of a squeaky office chair during an important call or meeting, so I appreciate these practical tips. What resonated most with me was the emphasis on regular maintenance — I used to neglect tightening bolts and never thought about applying lubricant regularly. Since I started doing routine checks every few months, my chair has stayed much quieter and feels more stable. I especially like the suggestion to keep a small toolkit handy for quick fixes; it makes a big difference when you have all the necessary tools within reach.
One challenge I often face is identifying which worn-out parts to replace, especially with high-mileage chairs. For anyone else struggling with that, do you have advice on how to tell when it’s time for a component upgrade versus just routine maintenance? Are there specific signs to watch out for that indicate a more urgent replacement? Would love to hear strategies from others who have managed to extend their chair’s life through DIY fixes.
Your detailed breakdown of maintaining an office chair really resonated with me, especially the emphasis on personalized adjustments and regular inspections. I’ve found that even small tweaks—like checking the tension of the tilt mechanism or replacing worn casters—can dramatically reduce squeaking and improve overall comfort. A tip I learned through trial and error is to keep a checklist of routine maintenance tasks; it ensures nothing gets overlooked, especially when busy with work deadlines.
Regarding Megan’s question on identifying when to upgrade parts, I typically look for signs like persistent wobbling, uneven support, or if the caster wheels no longer spin smoothly despite cleaning and lubrication. It’s also wise to monitor the chair’s stability over time—if you notice it wobbles or tilts unexpectedly, it might be time for a replacement. For those with high-mileage chairs, do you guys have specific indicators or tests you use to decide whether it’s better to repair or replace? I’d love to hear how others make that call without jumping straight to buying new components.